Difference between revisions of "Preparing for winter operations for winter parking lot and sidewalk maintenance"
| Line 62: | Line 62: | ||
*Invest in equipment that can deliver liquid deicers. | *Invest in equipment that can deliver liquid deicers. | ||
*Obtain a tank for liquid storage or find a near-by source of liquids to fill up trucks. | *Obtain a tank for liquid storage or find a near-by source of liquids to fill up trucks. | ||
| + | |||
| + | ===Calibration=== | ||
| + | Calibration is an essential procedure to understand how much material will be discharged at a given setting. No matter how sophisticated or simple the operation, calibrate each piece of equipment in the fall of the year. | ||
| + | |||
| + | '''Calibration tells how much material will be applied at each setting.''' | ||
| + | |||
| + | ====Simple Calibration for Salt Spreaders===== | ||
| + | If the equipment has different settings, it must be calibrated for each setting and for each product, as they all flow differently. It generally takes a team of two or three people to calibrate equipment efficiently. | ||
| + | |||
| + | ====Ground Speed Controlled Spreaders==== | ||
| + | Ground speed controlled spreaders are run by a computer in the cab and are tied to the speedometer and an auger or conveyor sensor in the rear of the truck. The application rate is set and the computer regulates the amount of salt discharged (regardless of the speed traveled) consistently. Most equipment used for winter maintenance of roads have ground speed controls. These are more effective and efficient systems than the manually controlled systems. | ||
| + | |||
| + | The equipment vendor will have specific calibration instructions for the operation based the type and brand of equipment. Contact them; it is in their best interest to provide instructions to calibrate and correct product use. This is the basic principle behind calibrating a ground speed controlled spreader: | ||
| + | *The speedometer input (sensor) lets the controller know how fast or slow the truck is traveling. | ||
| + | *The auger or conveyor input (sensor) tells the controller how fast or slow the auger is turning. | ||
| + | *To calibrate a ground oriented controller, input the pounds discharged per revolution. | ||
| + | *Once the computer knows the pounds/ revolution, it will calculate the necessary auger speed needed to hit the target application rates at the speed the truck is traveling. | ||
| + | '''Best bet: Contact manufacturer for calibration instructions.''' | ||
| + | |||
| + | '''Calibration allows accurate deicer use''' | ||
| + | |||
| + | ====Manual Controlled Spreaders==== | ||
| + | Manual controlled spreaders fall into two categories. Those that have an auger or conveyor and those that are gravity fed. They operate by selecting a setting that changes the size of the discharge opening and/or the auger or conveyor speed. More or less salt may be discharged depending on the speed of application. Most parking lot and sidewalk spreaders fit into one of these two categories. | ||
| + | |||
| + | '''All good programs are based on calibration of equipment.''' | ||
| + | |||
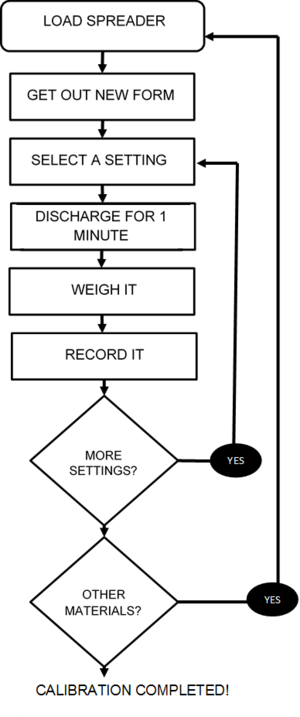
| + | The basic principle behind calibrating an auger/conveyor spreader is to choose a setting, run the spreader for a timed interval, and weigh the discharge. Record the discharge and repeat for all settings. In the end, there will be data that tells the operator how much material will be delivered at each setting. With this information, the operator can choose the proper setting. Without this information, they have no guidance on which setting to use. Calibration is different for gravity fed spreaders. There is more detail on this in a few pages. | ||
| + | |||
| + | '''Apply wisely. The chemicals applied cannot be recovered.''' | ||
| + | |||
| + | '''Surfaces such as pervious asphalt, pervious concrete, and pervious pavers do not experience refreeze. All melted snow and ice travel to the storage layer below the surface. Salt is generally not needed on these surfaces and sand should be avoided.''' | ||
| + | |||
| + | [[File:Steps for Calebrating an auger or conveyor system.png|right|thumb|300 px|alt=This graph of Steps for Celebrating an auger or conveyor system|<font size=3>Steps for Celebrating an auger or conveyor system</font size>]] | ||
| + | |||
| + | '''Example: Step #1, blank calibration form''' | ||
| + | |||
| + | See the References and Resources section for a full size form to copy for calibration. This is how the empty form looks.(Keep a stack of these on a clipboard when ready to begin the calibration.) | ||
| + | |||
| + | [[File:Calibration chart for auger or conveyor systems.PNG|right|thumb|300 px|alt=This form used for the calibration of auger or conveyor systems|<font size=3>form is used for the calibration of auger or conveyor systems</font size>]] | ||
| + | |||
| + | '''Example: Step #2, calibration form filled out during calibration''' | ||
| + | |||
| + | [[File:Calibration chart for auger or conveyor systems step 2.PNG|right|thumb|300 px|alt=This form used for the calibration of auger or conveyor systems - step 2|<font size=3>form is used for the calibration of auger or conveyor systems - step 2</font size>]] | ||
| + | |||
| + | Fill in the header information and column 2, the discharge weight per setting. | ||
| + | |||
| + | ''Example: Step #3, calibration form ready to put in truck for road application''' | ||
| + | |||
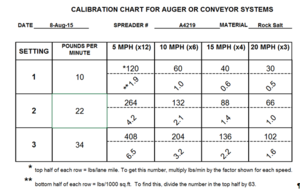
| + | Back in the shop, do the calculations to fill in the rest of the blanks. Multiply the weight in column 2 with the multiplier in the top row. This provides the pounds per mile that needed to fill in the table. | ||
| + | |||
| + | [[File:Calibration chart for auger or conveyor systems step 3.PNG|right|thumb|300 px|alt=This form used for the calibration of auger or conveyor systems - step 3|<font size=3>form is used for the calibration of auger or conveyor systems - step 3</font size>]] | ||
| + | |||
| + | '''Some fish species are affected by concentrations of less than 1000 ppm NaCl, about 1 to 1.5 tablespoons of salt in 5 gallons of water.''' | ||
| + | |||
| + | '''Example: Step #4, calibration form ready to zip tie to hand spreader or put in truck for parking lot application.''' | ||
| + | |||
| + | Divide by 63 to convert pounds per lane mile to pounds per 1,000 square feet. This is very useful for parking lot and sidewalk applications. | ||
| + | |||
| + | [[File:Calibration chart for auger or conveyor systems step 4.PNG|right|thumb|300 px|alt=This form used for the calibration of auger or conveyor systems - step 4|<font size=3>form is used for the calibration of auger or conveyor systems - step 4</font size>]] | ||
Revision as of 16:44, 22 February 2016
Contents
Policies/Plans
Start now—develop a maintenance policy or plan that guides winter operations. A little planning and communication up-front can help achieve better results throughout the season.
- Develop a maintenance policy or plan.
- Review the maintenance policy with the crew.
- Inform customers of the maintenance policy.
- In the plan:
- list the key actions to take during a winter event
- list the order of these actions
- address the level of service
- consider customer expectations, the hours and use of the building, priority access points and environmental concerns in the policy
- spell out any additional strategies such as routes, chemicals, application rate ranges etc.
- Follow the plan.
- Document actions.
- Review and update the maintenance policy each year.
Our waters are threatened by contracts which are based on fees for material use. This encourages overuse of materials.
Reduce liability. Establish a maintenance policy and follow it.
Training
Reduce risk by having a solid written winter maintenance policy and training program that utilizes best management practices. Schedule training for supervisors, staff, and customers.
The MPCA has three Smart Salting training classes available:
- Level 1 Winter maintenance of roads
- Level 1 Winter maintenance of parking lots/sidewalks
- Level 2 winter maintenance training for supervisory staff
Check the MPCA website to find out about upcoming training opportunities.
Getting prepared for winter
- Calculate the area of the parking lots, service roads, and sidewalks.
- Understand the environmental problems caused by snow, salt, and sand storage. Determine where and how to best store each item.
- Understand the properties of various deicers, and then select the type(s) to use.
- Train the crew on proper application rates.
- Mark islands, fire hydrants, and other landmarks that could be obscured by snow.
- Note existing conditions of curbs and other items that might be damaged by winter maintenance activities.
- Note or mark all catch basins, manholes, sidewalk segments that may cause a hazard to the plow and the operator.
Drainage
Inspect storm drains in the fall. Remove obstructions such as leaves, sticks, and trash to prepare for the spring melt. Because storm drains lead to lakes, rivers, ponds, and wetlands, never use salt to open frozen storm drains. Salt used to thaw frozen drains harms aquatic life. Use non-chemical methods such as heat to open drains.
Poor drainage on the maintenance surfaces will result in icy surfaces and will increase the risk of safety problems. These areas cause the application of salt on non-snow event days in the winter. To remedy this, inventory the site and note drainage problems. Make a checklist so the professional or client can fix these drainage problems in the summer.
Examples of drainage problems:
- Roof that drips on the steps
- Downspout discharging on sidewalk
- Sidewalk segments sloped into a V
- Potholes or low spots in parking lots
Storm drains lead to the nearest lake, river, pond, or wetland. They do not go to a treatment plant.
Equipment
The trend in winter maintenance is to use less material to accomplish the same results. Following this trend will reduce environmental impacts and save money. Below are listed a few tips, but there are many other innovations in the equipment area that can help to reduce application rates.
- Purchase a pavement sensor (Figure 8)
- Buy equipment that can deliver very low rates of granular products.
- Outfit larger trucks with ground speed controls so that the application rate changes automatically as the speed changes.
- Modify existing equipment so that it can discharge the application rates described in the “Application Rates” section. Older equipment often applies more salt than recommended.
- Outfit sidewalk spreaders with shields to better direct the spread pattern.
- Invest in equipment that can deliver liquid deicers.
- Obtain a tank for liquid storage or find a near-by source of liquids to fill up trucks.
Calibration
Calibration is an essential procedure to understand how much material will be discharged at a given setting. No matter how sophisticated or simple the operation, calibrate each piece of equipment in the fall of the year.
Calibration tells how much material will be applied at each setting.
Simple Calibration for Salt Spreaders=
If the equipment has different settings, it must be calibrated for each setting and for each product, as they all flow differently. It generally takes a team of two or three people to calibrate equipment efficiently.
Ground Speed Controlled Spreaders
Ground speed controlled spreaders are run by a computer in the cab and are tied to the speedometer and an auger or conveyor sensor in the rear of the truck. The application rate is set and the computer regulates the amount of salt discharged (regardless of the speed traveled) consistently. Most equipment used for winter maintenance of roads have ground speed controls. These are more effective and efficient systems than the manually controlled systems.
The equipment vendor will have specific calibration instructions for the operation based the type and brand of equipment. Contact them; it is in their best interest to provide instructions to calibrate and correct product use. This is the basic principle behind calibrating a ground speed controlled spreader:
- The speedometer input (sensor) lets the controller know how fast or slow the truck is traveling.
- The auger or conveyor input (sensor) tells the controller how fast or slow the auger is turning.
- To calibrate a ground oriented controller, input the pounds discharged per revolution.
- Once the computer knows the pounds/ revolution, it will calculate the necessary auger speed needed to hit the target application rates at the speed the truck is traveling.
Best bet: Contact manufacturer for calibration instructions.
Calibration allows accurate deicer use
Manual Controlled Spreaders
Manual controlled spreaders fall into two categories. Those that have an auger or conveyor and those that are gravity fed. They operate by selecting a setting that changes the size of the discharge opening and/or the auger or conveyor speed. More or less salt may be discharged depending on the speed of application. Most parking lot and sidewalk spreaders fit into one of these two categories.
All good programs are based on calibration of equipment.
The basic principle behind calibrating an auger/conveyor spreader is to choose a setting, run the spreader for a timed interval, and weigh the discharge. Record the discharge and repeat for all settings. In the end, there will be data that tells the operator how much material will be delivered at each setting. With this information, the operator can choose the proper setting. Without this information, they have no guidance on which setting to use. Calibration is different for gravity fed spreaders. There is more detail on this in a few pages.
Apply wisely. The chemicals applied cannot be recovered.
Surfaces such as pervious asphalt, pervious concrete, and pervious pavers do not experience refreeze. All melted snow and ice travel to the storage layer below the surface. Salt is generally not needed on these surfaces and sand should be avoided.
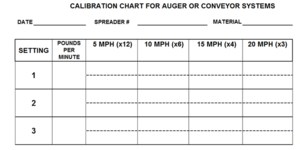
Example: Step #1, blank calibration form
See the References and Resources section for a full size form to copy for calibration. This is how the empty form looks.(Keep a stack of these on a clipboard when ready to begin the calibration.)
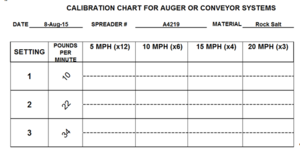
Example: Step #2, calibration form filled out during calibration
Fill in the header information and column 2, the discharge weight per setting.
Example: Step #3, calibration form ready to put in truck for road application'
Back in the shop, do the calculations to fill in the rest of the blanks. Multiply the weight in column 2 with the multiplier in the top row. This provides the pounds per mile that needed to fill in the table.
Some fish species are affected by concentrations of less than 1000 ppm NaCl, about 1 to 1.5 tablespoons of salt in 5 gallons of water.
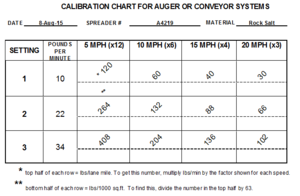
Example: Step #4, calibration form ready to zip tie to hand spreader or put in truck for parking lot application.
Divide by 63 to convert pounds per lane mile to pounds per 1,000 square feet. This is very useful for parking lot and sidewalk applications.
