This page is in development
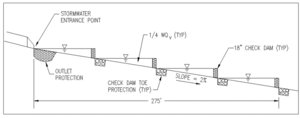
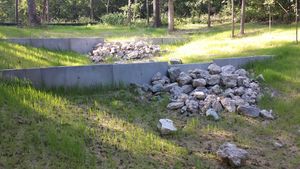
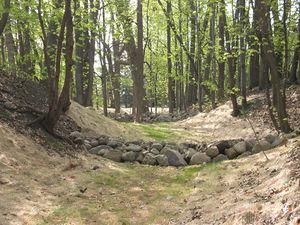
A check dam is a structure installed perpendicular to flow in a natural or manmade conveyance channel to reduce flow velocity. By slowing flow velocities, check dams can serve multiple functions including reduction of channel scour and erosion, enhancement of sediment trapping, and greater treatment of the water quality control volume via enhanced water detention or retention. Typical check dam materials include rock, earth, wood, and concrete.
Contents
- 1 Applicability
- 2 Planning considerations
- 3 Design and construction
- 4 Types of check dams
- 5 Design procedure – design steps
- 5.1 Compute water quality volume requirement for the project
- 5.2 Compute number of check dams
- 5.3 Calculate check dam spacing
- 5.4 Calculate drawdown time
- 5.5 Calculate water quality volume achieved
- 5.6 Check 2-year and 10-year velocity erosion potential and freeboard
- 5.7 Design low flow control
- 5.8 Finalize check dam design
- 5.9 Sample calculations
- 6 Construction Checklist
- 7 Standards and specifications
- 8 Inspection
- 9 Maintenance
- 10 Reference materials
- 11 Related pages
Applicability
Incorporation of check dams into swale design allows treatment of a portion or all of the water quality volume (Vwq) within a series of cells created by the check dams. Check dams are relatively inexpensive and easy to install. They are not approved for use in regulated waterbodies (i.e., Waters of the State) without permit coverage from the U.S. Army Corps of Engineers under Section 404 of the Clean Water Act. MPCA water quality certification requirements also apply.
Site applicability
While most flatter and shorter swales (i.e., slope less than 3 percent, length less than 200 feet) generally do not need check dams if they are stabilized immediately after construction (i.e., with sod, or seed and the appropriate rolled erosion control product), longer and steeper swales can benefit from check dam installations. When evaluating the use of check dams for a particular site, consider the following.
- When carefully located and constructed, check dams installed as sediment controls during construction may also function as permanent installations.
- Removal may be costly for some types of check dams.
- Check dams are suitable only for a limited drainage area (generally 10 acres or less).
- Check dams are intended for use in small open channels, not streams or rivers.
- Hydraulic capacity of the channel can be reduced when check dams are in place.
- Check dams may create turbulence downstream, causing erosion of the channel banks.
- Ponded water may kill grass or other vegetation in dry swales, wet swales, and stormwater step pools.
- Check dams may be an obstruction to construction equipment.
MPCA permit applicability
One of the goals of this Manual is to facilitate understanding of and compliance with the MPCA Construction General Permit (CGP), which includes design and performance standards for permanent stormwater management systems. These standards must be applied in all projects in which at least 1 acre of land is disturbed and 1 acre of new impervious area is being created, and the permit stipulates certain standards for various categories of stormwater management practices. When volume control is constrained at a site and other BMP options (e.g. constructed pond, media filter) are not feasible, impermeable check dams can be incorporated into the design of swales to detain or retain water for extended periods thereby providing treatment for a portion or all of the water quality volume stored behind the check dams. For regulatory purposes, swales that incorporate check dams into their design fall under the “Infiltration / Filtration" category described in Part III.D.1. of the MPCA CGP.
Planning considerations
Check dams are rarely effective in steep channels (i.e., more than 10 percent slope) and are easily dislodged by high flow velocities if they are not designed, sized, and installed properly. Common causes of failure include
- failure to account for high intensity rain storms,
- use of rock that is too small for flow velocities/volumes present,
- use of check dams that are too short or that are spaced too far apart, and
- presence of woody or other debris in storm flows, causing structural damage to check dams.
Planning guidelines and material selection for check dams are driven by site considerations (e.g., swale slope, length, flow velocities, soils) and the longevity desired. In general, swale slope should not exceed 10 percent (otherwise, a drop structure should be considered), the drainage area should not exceed 10 acres, and flow velocities should not exceed 12 feet per second for a 10-year, 24-hour storm frequency.
Design and construction
General guidelines
General installation guidelines for check dams include the following.
- Select a check dam type to meet longevity and other design objectives.
- Complete final grading of the swale and rock/debris removal prior to check dam installation.
- Channel protection and stabilization (i.e., with turf reinforcement mats, Type 3 or 4 erosion control blankets, seed, etc.) should be achieved prior to installation of check dams.
- Install check dams immediately after swale stabilization (i.e., seeding and mulching or installation of rolled erosion control products).
- Install check dams across entire width of swale, perpendicular to the flow.
- Configure check dams so the sides extend up the bank slopes, with the overflow in the middle.
- Check dams should be keyed into the side slope a minimum of 3 feet.
- Overflow dips in the middle of the check dam should be 1 foot lower than the sides.
- Ensure culvert entrances below check dams are not subject to damage or blockage from displaced stones.
- Protect the channel downstream of the lowest check dam from erosion, since water will flow over and around the dam.
- Ensure that the channel is stable above the most upstream check dam.
Types of check dams
Rock check dams
Rock or rip rap check dams should consist of well-graded stone consisting of a mixture of rock sizes. Since rock check dams are permeable, they are not suitable for situations where enhanced infiltration is desired and cannot be used to achieve the water quality volume when required for permit compliance.
- For best results, use mixed sizes of aggregate and riprap that are collectively sized to withstand expected ditch channel flows (typically 1.5 inch to 12 inches). For example, a check dam specification may require Class IV riprap with percent less than the specified rock diameter:
- 100%: < 24 inches
- 75%: < 15 inches
- 50%: < 9 inches
- 10%: < 4 inches
- Rock check dams may be constructed of riprap, with a coarse aggregate facing on the uphill side.
- Other options include 1.5-inch clean gravel and river rock.
- Place a strip of nonwoven geotextile below check dam to provide a stable foundation and for easier removal.
- Construct check dams 4 to 5 feet wide at the bottom, and 1.5 to 2 feet wide at the top.
- Construct check dams 1.5 to 2 feet high, with side slopes no steeper that 2H:1V.
- To increase the effectiveness of rock check dams, a shallow pool upstream of the check is recommended, which allows additional sediment settling and storage.
Earth check dams
Earth check dams are constructed with clayey soils with low permeability and therefore are considered impermeable. These check dams have greater potential to erode relative to check dams made from rock, wood, or concrete, and therefore care should be taken during and after construction to ensure the earth check dam is fully stabilized with grass cover before subjected to high storm flows and velocities. Erosion potential should be checked for the channel and earth check dam. Rock or aggregate can be placed on and/or downstream of the check dam to prevent erosion of the check dam material and channel material.
Wood check dams
Wood check dams may use either pressure treated or natural wood. Wood check dams should be embedded at least 3 feet horizontally into side slopes. Pressure treated wood dams should follow AWPA Standard C6 specifications and are typically 6 inches by 6 inches or 8 inches by 8 inches in size. Creosote should not be used to coat pressure treated wood dams, as it contains pollutants that can leach out of the wood. Wood check dams constructed using natural materials are typically 6 inches to 12 inches in diameter and may be notched as necessary to keep flow concentrated in the center of the channel and to achieve the required drawdown time. Tree species that can withstand prolonged exposure to inundation (black locust, red mulberry, cedars, catalpa, white oak, chestnut oak, and black walnut) are preferred for use in natural wood check dams, while those with a tendency to rot should not be used (ash, beech, birch, elm, hackberry, hemlock, hickories, maples, red and black oak, pines, poplar, spruce, sweetgum, and willow).
Erosion potential should be checked for the channel and downstream of the check dam. Rock or aggregate can be placed upstream and downstream of the check dam to prevent erosion of the channel material.
Concrete check dams
Concrete check dams may be preferred when expected flow velocities could be high enough to compromise the structural integrity of the check dam if other materials were used. Rock check dams should be embedded at least 3 feet horizontally into side slopes. Concrete check dams should have a minimum thickness of 6 inches and a minimum height of 6 inches.
Precast check dams are required in order to minimize the potential for contamination of the surrounding soils.
Erosion potential should be checked for the channel and downstream of the check dam. Rock or aggregate can be placed upstream and downstream of the check dam to prevent scour and erosion of the channel material.
Design procedure – design steps
Compute water quality volume requirement for the project
To meet requirements of the Stormwater General Permit (CSW permit), infiltration or filtration systems must provide a water quality volume (Vwq) of one inch of runoff from new impervious surfaces created by the project.
- Vwq = 1 inch × Areaimpervious surface
If a portion of the Vwq is treated by another stormwater control measure(s), the volume to be treated by the swale with check dams should be computed using the above equation minus the Vwq portion treated by the other measure(s). If multiple check dams are used to create a series of cells, the volume of water within each cell should add up to the overall Vwq or the portion of the Vwq not treated by other stormwater control measure(s).
Compute number of check dams

The number of check dams should be computed based on swale slope, length, and treatment objectives. For example, a swale designed to contain the entire Vwq may require more check dams than a swale that only contains a portion of the Vwq.
Channel slopes between 0.5 and 2 percent are recommended unless topography necessitates a steeper slope, in which case 6- to 12-inch drop structures can be placed to limit the energy slope to within the recommended 0.5 to 2 percent range. Energy dissipation will be required below the drops. Spacing between the drops should not be closer than 50 feet. Depth of the Vwq at the downstream end should not exceed 18 inches.
Calculate check dam spacing
The spacing between check dams should be such that the bottom of the upstream check should be at the same elevation as the top of the downstream check. General check dam spacing can be calculated by dividing the height of the structure by the slope percentage (represented in decimal form).
- Distance between check dams = (check dam height) / (swale longitudinal slope)
Calculate drawdown time
When check dams are used to enable treatment of the entire Vwq via filtration (e.g., dry swales with underdrain or biofiltration), the filtration bed should be designed to pass the Vwq in 48 hours. Drawdown time for water ponded behind check dams used in tandem with a dry swale with underdrain system can be calculated based on the soil media infiltration rate and underdrain characteristics (diameter, material).
When check dams are used to increase Vwq retention via infiltration (e.g., dry swales with no underdrain or bioinfiltration), the drawdown time (Tdrawdown) should be calculated as a function of the maximum depth between check dams and the design infiltration rate for the appropriate soil group using the equation below.
- Tdrawdown = (maxiumum depth behind check dam) / (soil infiltration rate)
Calculate water quality volume achieved
The water quality volume (Vwq) achieved behind each check dam (instantaneous volume) is given by
\( V_{wq} = h^2 * (h * H + B_w)]/(2S) \)
where
- h = check dam height (inches)
- H = horizontal component of the swale side slope (1 vertical : H horizontal)(inches)
- S = slope (unitless); and
- Bw = channel bottom width (inches)
Add the Vwq for each check dam together to obtain the cumulative water quality volume for the swale.
Check 2-year and 10-year velocity erosion potential and freeboard
Check for erosive velocities and modify design as appropriate based on local conveyance regulations. Provide a minimum of 6 inches of freeboard.
Design low flow control
Design control to meet the required 48 hour drawdown time. For wet swales, the water level should draw down to the flow line of the controlling check dam elevation within 48 hours.
Finalize check dam design
Adjust the preliminary check dam dimensions to accommodate site specific concerns/impacts. Minimum design parameters for hydraulic and water quality criteria should be rechecked based on adjustments to the check dams to ensure that safe and adequate conveyance is still maintained.
Sample calculations
The following example illustrates use of the above design equations. Assuming 3 check dams are used to enhance water retention for a dry swale with no underdrain (bioinfiltration) constructed over a longitudinal slope of 2% on soils with an infiltration rate of 0.45 in/hr, with a bottom width of 5 ft, side slopes of 2H:1V, and check dam height of 1.5 ft, calculate: (1) the distance between check dams, (2) the drawdown time, and (3) the water quality volume achieved.
Distance between check dams
- Distance between check dams = (check dam height)/(swale longitudinal slope) = (1.5 ft)/0.02 =75 ft
Drawdown time
- Tdrawdown = (maximum depth behind check dam) / (soil infiltration rate) = (1.5 ft*(12 in)/ft) /( 0.45 in/hr) = 40 hr
Water quality volume achieved
- Vwq = (h2 (hH + Bw)) / (2S) × #dams = ((1.5ft)2 ((1.5ft)(2) + 5ft)) / (2)(0.02) × 3 =1350 ft3
Construction Checklist
Inspections during construction are needed to ensure check dams are built in accordance with the approved design standards and specifications. Detailed inspection checklists should be used that include sign-offs by qualified individuals at critical stages of construction, to ensure that the contractor’s interpretation of the plan is acceptable to the professional designer. An example construction phase inspection checklist is provided below.
Check dam inspection checklist.
Link to this table
| Project: | ||
|---|---|---|
| Location: | ||
| Site Status: | ||
| Date: | ||
| Time: | ||
| Inspector: | ||
| Construction sequence | Satisfactory / Unsatisfactory | Comments |
| Check dam material as per design specifications | ||
| Check dam installation as per design specifications | ||
| Dimensions per plan | ||
| Spacing and grade per plan | ||
| Final inspection | Satisfactory / Unsatisfactory | Comments |
| Check dams operational | ||
| Check dam structural integrity – shape, anchoring | ||
Standards and specifications
Check dam materials specifications.
Link to this table
| Parameter | Specification | Size | Note |
|---|---|---|---|
| Check dam (pressure treated) | AWPA Standard C6 | 6” by 6” or 8” by 8” | do not coat with creosote; embed at least 3’ into side slopes |
| Check Dam (natural wood) | Black Locust, Red Mulberry, Cedars, Catalpa, White Oak, Chestnut Oak, Black Walnut | 6” to 12” diameter; notch as necessary | do not use the following, as these species have a predisposition towards rot: Ash, Beech, Birch, Elm, Hackberry, Hemlock, Hickories, Maples, Red and Black Oak, Pines, Poplar, Spruce, Sweetgum, Willow |
| Check dam (rock, rip rap) | per local criteria | Size per requirements based on 10-year design flow | Not suitable for infiltration |
| Check dam (earth) | Per local criteria | Size per requirements based on 10-year design flow | Use clayey soils with low permeability |
| Check dam (pre-cast concrete | per pre-cast manufacturer | Size per requirements based on 10-year design flow | Testing of pre-cast concrete required:
28 day strength and slump test; all concrete design (cast-in-place or pre-cast) not using previously approved State or local standards requires design drawings sealed and approved by a licensed professional structural engineer. |
Inspection
Specific inspection guidelines for check dams include the following.
- Regular inspections should be made to ensure that the center of the dam is lower than the edges.
- Check the structural integrity of the check dams – shape, anchoring, and overall condition.
- Look for scour underneath the check dam and bypasses on the sides.
- Note the amount of sediment deposited upslope of the check dams.
- Observe erosion of swale segments between check dams – downcutting and side scour.
Maintenance
Specific maintenance guidelines for check dams include the following.
- Remove sediment adjacent to and accumulated behind check dams before it reaches halfway to the top of the dam.
- Restore dislodged or washed out check dams to their original configuration.
- Fill in or otherwise repair areas where check dam undercutting or bypasses have occurred.
- Add stones to rock check dams as needed to maintain design height and cross section. Use larger stone, if necessary, to counter higher-than-expected flow velocities.
- Repair swale areas where excessive downcutting or side scour have occurred.
- If the selected configuration is not preventing channel erosion, consider other materials or closer spacing in areas experiencing the most problems.
- If significant erosion occurs between dams, install a protective turf reinforcement mat or section of rip rap liner in that portion of the channel.
Check dam maintenance checklist.
Link to this table
| Project: | ||
|---|---|---|
| Location: | ||
| Site Status: | ||
| Date: | ||
| Time: | ||
| Inspector: | ||
| Maintenance item | Satisfactory / Unsatisfactory | Comments |
| No evidence of flow going around structures | ||
| No evidence of erosion at downstream toe | ||
| No evidence of displaced rock or riprap | ||
| No evidence of dead vegetation | ||
| No evidence of deterioration of the check dam materials | ||
| No blockage of the notch or low point | ||
Reference materials
- Clean Water Services Erosion Prevention and Sediment Control Manual (4.2.1 Check Dam, 4.3.7 Pre-Fabricated Barrier System, 4.3.14 Wattles)
- North Carolina Erosion and Sediment Control Planning and Design Manual (6.63 Rock Dam)
- Tennessee Department of Environment and Conservation (TDEC) Erosion and Sediment Control Handbook (7.20 Check dam, 7.25 Tubes and wattles)
- Virginia Erosion and Sediment Control Handbook (3.20 Rock Check Dams)


