Sediment control practices - Check dams (ditch checks, ditch dikes)
Check dams, also called ditch checks, dikes, wattles, etc., are temporary or permanent linear structures placed perpendicular to concentrated flows such as in drainage ditches, channels, and swales to reduce flow velocities and prevent channel down-cutting. Some sediment trapping may occur during low flows. Check dam materials may include rock, fiber logs (e.g., wattles), triangular sediment dikes, sand bags, and other materials or prefabricated systems. Straw/hay bales and silt fences should not be used for check dam applications, as they are not intended for concentrated flow areas.
Contents
Purpose and function
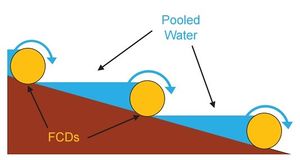
Check dams are not intended as a replacement for proper ditch/channel stabilization (e.g., erosion blanket or turf mat over seed, use of rip-rap, etc.). Check dams help reduce ditch and channel velocities, prevent erosion, and trap small amounts of sediment by intercepting flow along a ditch or channel. The disruption in flow direction and speed creates low velocity areas on the upgradient side of the check dam, causing deposition of heavier sediment particles and resulting in reduced scour potential (i.e., lateral and vertical erosion). Under low-flow conditions, water ponds behind the structure and then slowly drains through, infiltrates, or evaporates. Under high-flow conditions, water flows over and/or through the structure. The main function of a check dam is to decrease velocity, not to collect sediment, although sediment capture and increased infiltration is an added benefit. Check dams are not a suitable substitute for major perimeter sediment trapping measures and can be easily washed away by high ditch/channel flows if they are not designed or installed properly.
Applicability
Check dams may be used in ditches or channels to reduce erosion and trap sediment. Check dams are relatively inexpensive and easy to install. They are not approved for use in regulated waterbodies (i.e., Waters of the State) without permit coverage from the U.S. Army Corps of Engineers under Section 404 of the Clean Water Act. MPCA water quality certification requirements also apply.
Site applicability
Check dams are used to regulate flow velocities, reduce scour erosion, and trap small quantities of sediment along higher-risk ditches and channels that have slopes greater than 10 percent and soil types conducive to erosion (e.g., sandy/silty soils). They are appropriate for both temporary and permanent ditches and swales. While most flatter and shorter channels (i.e., slope less than 3 percent, length less than 200 feet) generally do not need check dams if they are stabilized immediately after construction (i.e., with sod, or seed and the appropriate rolled erosion control product), longer and steeper ditches can benefit from check dam installations. When evaluating the use of check dams for a particular site, consider the following.
- When carefully located and constructed, check dams may function as permanent installations.
- Rock from a temporary check dam can be spread into a ditch and used as a channel lining when the check dam is no longer necessary.
- Removal may be costly for some types of check dams.
- Check dams are suitable only for a limited drainage area (generally 10 acres or less).
- Check dams are intended for use in small open channels, not streams or rivers.
- Hydraulic capacity of the channel can be reduced when check dams are in place.
- Check dams may create turbulence downstream, causing erosion of the channel banks.
- Ponded water may kill grass in grass-lined channels.
- Check dams may be an obstruction to construction equipment.
Permit applicability
Check dams are part of the overall stabilization system for a ditch or channel, and their use is driven by site conditions – specifically, channel slope, length, soil type, and flow velocities. MPCA Construction Stormwater General Permit states that Permittees must stabilize the normal wetted perimeter of the last 200 linear feet of temporary or permanent drainage ditches or swales that drain water from the site within 24 hours after connecting to a surface water or property edge. Permittees must complete stabilization of remaining portions of temporary or permanent ditches or swales within 14 calendar days after connecting to a surface water or property edge and construction in that portion of the ditch temporarily or permanently ceases.
In addition, Permittees must stabilize the normal wetted perimeter of the last 200 linear feet of temporary or permanent drainage ditches or swales that drain water from the site within 24 hours after connecting to a surface water or property edge. Permittees must complete stabilization of remaining portions of temporary or permanent ditches or swales within 14 calendar days after connecting to a surface water or property edge and construction in that portion of the ditch temporarily or permanently ceases.
Effectiveness
Check dams are moderately effective in trapping sediment, and highly effective in preventing downcutting in a ditch or channel when used with appropriate rolled erosion control products installed over seed. They generally provide relatively fair-to-good removal of coarse and medium-sized sediment from runoff; however, most fine silt and clay particles will pass through the voids on these structures. Their primary benefit lies in preventing erosion prior to seed germination and growth in vegetated ditches and channels. The following table summarizes expected performance for an array of typical water quantity and quality target constituents for check dams.
Expected performance for check dams
Link to this table
| Water Quantity | |
|---|---|
| Flow attenuation | Secondary design benefit |
| Runoff volume reduction | Secondary design benefit |
| Water Quantity | |
| Pollution prevention | |
| Erosion prevention (i.e., for channel banks) | Primary design benefit |
| Sediment control | Secondary design benefit |
| Nutrient loading | Secondary design benefit |
| Pollutant removal | |
| Total suspended solids | Secondary design benefit |
| Total phosphorus | Secondary design benefit |
| Heavy metals | Secondary design benefit |
| Floatables | Secondary design benefit |
| Oil and grease | Secondary design benefit |
Planning considerations
Check dams are rarely effective in steep channels (i.e., more than 10 percent slope), and are easily dislodged by high ditch/channel flow velocities if they are not designed, sized, and installed properly. Common causes of failure include
- failure to account for high intensity rain storms,
- use of rock that is too small for flow velocities/volumes present,
- failure to secure temporary dike products against heavy flows,
- use of fiber log stakes that are too short or that are spaced too far apart, and
- presence of woody or other debris in storm flows, causing structural damage to check dams.
Planning guidelines and material selection for check dams are driven by site considerations (e.g., ditch/channel slope, length, flow velocities, soils) and the longevity desired. In general, ditch/channel slope should not exceed 10 percent (otherwise, a drop structure should be considered), the drainage area should not exceed 10 acres, and flow velocities should not exceed 12 feet per second for a 10-year, 24-hour storm frequency.
When installing drainage ditches or channels, plan to stabilize them immediately after construction, as required. Un-vegetated/unarmored ditches and channels erode quickly on contact with flowing water, especially when they are long and steep. Include check dams as part of the ditch erosion prevention and sediment control system when ditches are longer than 200 feet and steeper than 3 percent. Wide, flat swales (i.e., less than 1 percent slope, greater than 4 foot width) can also benefit from check dam installations when used as temporary linear sediment traps during the construction phase.
Design and construction
Check dam types vary by composition and installation approach. Fiber logs, filled bags, and other check dams can include items made of straw, wood fiber, compost, wood slash, soil, sand, aggregate, riprap, and specialty products. These specific material compositions of various check dams largely determine its longevity once installed in the field. Spacing of the check dams within the ditch or channel will vary in accordance with slope and soil type (see table below for example spacing). Some check dam types, like decomposable fiber logs, typically do not require removal since they can be left in the ditch or channel to deteriorate and add organic matter to further support vegetation establishment. Where appropriate, rock check dams can be spread out along ditch bottoms after the channel is vegetated as long as disturbance from equipment is minimized or stabilized immediately afterwards. Manufactured sediment dikes and rock bag check dams must be removed after stabilization, prior to closing out the project permit.
General installation guidelines for all check dams include the following.
- Select a check dam type to meet longevity and other design objectives.
- Complete final grading of the ditch and rock/debris removal prior to check dam installation.
- Channel protection and stabilization (i.e., with turf reinforcement mats, Type 3 or 4 erosion control blankets, seed, etc.) should be achieved prior to installation of check dams.
- Install check dams immediately after ditch/channel stabilization (i.e., seeding and mulching or installation of rolled erosion control products).
- Install check dams all the way across the ditch or channel, perpendicular to the flow.
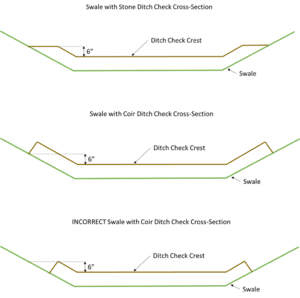
- Configure check dams so the sides extend up the bank slopes, with the overflow in the middle.
- The ends of each dam should be installed up bank slopes so that the bottom of the dam is 6 inches higher than the top of the center; this practice prevents water from running around the ends and causing additional erosion.
- Overflow dips in the middle of the check dam should be 8 to 12 inches lower than the sides.
- Ensure culvert entrances below check dams are not subject to damage or blockage from displaced stones.
- Protect the channel downstream of the lowest check dam from erosion, since water will flow over and around the dam.
- Ensure that the channel is stable above the most upstream check dam.
- If check dams are to be removed, vegetate and stabilize the footprint area immediately after removal. Seeding, mulching, or matting are appropriate stabilization practices.
- The maximum height of check dams varies by material (see table below for examples).
- The spacing between ditch checks should be such that the bottom of the upstream check should be at the same elevation as the top of the downstream check.
- General check dam spacing can be calculated by dividing the height of the structure by the slope percentage (i.e., represented in the decimal form, for example, 5 percent = 0.05, etc.).
Example check dam types spacing slope applications and longevity
Link to this table
| Check Dam Type | Spacing for Various Ditch Slopes (feet)1 | Slope Applications | Longevity | |||
|---|---|---|---|---|---|---|
| Up to 2% | 3-5% | 6-9% | 10-15% | |||
| Mixed size rock (2 ft height) | 100 | 67-40 | 33-22 | 20-13 | Up to 15% | > 2 years |
| Rock bags (16 inch height) | 75 | 50-30 | 25-17 | 15-10 | Up to 15% | Up to 1 year |
| Rock bags (10 inch height) | 42 | 28-17 | 14-9 | 8-6 | Up to 15% | Up to 1 year |
| Triangular sediment dike (10 inch height) | 42 | 28-17 | 14-9 | 8-6 | Up to 15% | 1 to 2 years |
| Fiber log – wood / mulch (10 inch) | 42 | 28-17 | 14-9 | 8-6 | Up to 15% | 1 to 2 years |
| Fiber log – straw (10 inch) | 42 | 28-17 | 14-9 | NA | Up to 10% | Up to 6 months |
1 Note: reduce spacing intervals for highly erodible soils.
Rock check dams
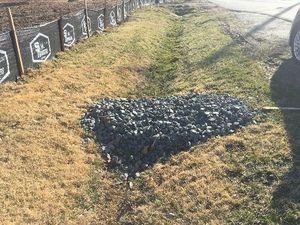
- Rock check dams should consist of well-graded stone consisting of a mixture of rock sizes.
- For best results, use mixed sizes of aggregate and riprap that are collectively sized to withstand expected ditch channel flows (typically 1.5 inch to 12 inches). For example, a check dam specification may require Class IV riprap with percent less than the specified rock diameter:
- 100%: < 24 inches
- 75%: < 15 inches
- 50%: < 9 inches
- 10%: < 4 inches
- Check dams may be constructed of riprap, with a coarse aggregate facing on the uphill side.
- Other options include 1.5-inch clean gravel and river rock.
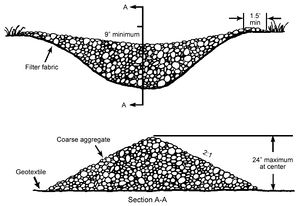
- Place a strip of nonwoven geotextile below check dam to provide a stable foundation and for easier removal.
- Construct check dams 4 to 5 feet wide at the bottom, and 1.5 to 2 feet wide at the top.
- Construct check dams 1.5 to 2 feet high, with side slopes no steeper that 2H:1V.
- To increase the effectiveness of rock check dams, a shallow pool upstream of the check is recommended, which allows additional sediment storage.
- For spacing and other details, see the table above.
Rock/sand bag check dams
Rock/sand bags are manufactured from durable, weather resistant, tightly woven geotextile fabric material sufficient to prevent leakage of the filler material. They are relatively low cost and easy to install, move, replace, and reuse (if not damaged). Rock/sand bag check dams are a good short-term solution where concentrated flows are causing erosion, and can also be used to divert and slow the velocity of small flows. Biofilter bags may also be used when firmly staked to the ground. Additional rock/sand bag considerations include the following.
- Use fabric or net bags, with one-inch stone.
- Fill bags only three-fourths full of rock, to reduce gaps in the check dam.
- Construct check dams 1.5 to 2 feet high, with side slopes no steeper that 2H:1V.
- Rock/sand bags are not appropriate on steep slope applications or where water velocities or volumes are high.
- They can easily be damaged by construction equipment and are generally only effective for a few months.
- The ends of the bags should be tightly abutted and overlapped to direct flow away from bag joints.
For example spacing and other details, refer to the table above.
Triangular sediment/silt dike
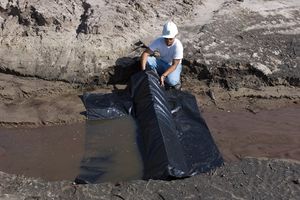
Triangular sediment/silt dikes are pre-fabricated triangular shaped blocks typically made of foam or other flexible, lightweight material and covered with geotextile fabric. The geotextile extends from the bottom of the dike to provide aprons on the upslope and downslope sides, and the dike is anchored by trenching and stapling the aprons. They will form a check dam when laid in the channel. Material, section length, and weights vary among manufacturers, but they are all designed to be lightweight and relatively easy to install and maintain. Consider the following when using triangular dikes.
- Follow manufacturer’s instructions regarding product applications, limitations, and installation.
- Make sure product is trenched in and stapled down correctly, to reduce bypasses.
- Use longer stakes, and reduce stake spacing, where higher velocity flows are expected.
- These systems are not intended for use in steep slope applications or where water velocities or volumes are high.
- Because they are lightweight, they can easily be damaged by construction equipment.
- Products that are not damaged or deteriorated may be reused.
Fiber log check dams
Fiber logs (straw wattles, excelsior logs) are straw and wood-fiber cores wrapped with synthetic netting. They can be partially buried in a channel to create mini-dams.
- Fiber logs are available in many diameters to meet site requirements.
- Fiber logs can be helpful in establishing permanent vegetation in a channel.
- Follow manufacturer’s instructions regarding product applications, limitations, and installation.
- When staking down, ensure good soil contact for the full length of the fiber log.
- Use stakes that are 16 inches longer than the diameter of the fiber log for soft soils and 10 inches longer than the fiber log diameter in hard or rocky soils. Space stakes 1 to 2 feet apart.
- For example spacing and other details, see the table above.
Erosion control blanket pillow checks
Erosion control blankets installed in ditches can be folded over to create “pillow checks” across the bottom of the channel. To install, fold a 12 to 16 inch section of the blanket over itself during blanket installation in the ditch bottom and stake down securely with long staples or wooden stakes spaced every 12 inches. An alternate approach is to install the erosion blanket or turf reinforcement mat after seeding the ditch/channel, then install folded-over sections of blanket at regular intervals on top, similar to installation of other ditch checks. Spacing can range from 50 to 60 feet for flat ditches/channels and 15 to 20 feet for steeper sections. Pillow checks can be left in the ditch or channel to decompose naturally.
Curb gutter checks
In developed residential and urban environments, a series of gutter checks can be installed in the runoff flow path along the curb to slow down flows and trap sediment. Sand bags and rock bags are used most often for this purpose. To install, lay the end of the bag against the curb, with the other end angled slightly upgradient. Make sure the end of the bag against the curb butts up tightly, to prevent bypasses between the curb and the bag. Install other bags similarly along the curb, so that sediment laden water flowing along the curb must go around the small check dams. Spacing of the bags should be from 5 to 10 feet apart. Installation can occur from the downgradient curb or other inlet and on up the slope, to the full extent of the area delivering sediment to the curb line. Bags should not need anchoring, due to the weight of the sand or rock.
Standards and specifications
MnDOT Standard Plan 5-297.405 provides standard detail for ditch checks utilized for temporary sediment control (effective date: 8/6/2014). BMP types covered include “Rock Ditch Checks (Filter Berms) Type 3 (Rock Weeper) or Type 5 (Rock)”, “Sediment Control Log (Blanket System)”, and “Sediment Control Log (Wood Fiber or Compost)”.
The MnDOT Standard Specifications for Construction (2016 edition) provide brief guidance pertaining to the use of filter berms and sediment control logs as ditch checks (Specification 2573.3.E and F). This guidance mainly specifies that ditch checks be installed perpendicular to the ditch gradient. Materials specifications that may be applicable, depending on selected design, include Specification 3601 (Riprap Material), 3733 (Geotextiles), 3885 (Rolled Erosion Control Products), and 3886 (Silt Fence).
Inspection
Check dams should be inspected regularly, especially after rainfall exceeding 0.5 inch. The construction permit states "During each inspection, permittees must inspect surface waters, including drainage ditches and conveyance systems but not curb and gutter systems, for evidence of erosion and sediment deposition. Permittees must remove all deltas and sediment deposited in surface waters, including drainage ways, catch basins, and other drainage systems and restabilize the areas where sediment removal results in exposed soil. Permittees must complete removal and stabilization within seven (7) calendar days of discovery unless precluded by legal, regulatory, or physical access constraints." Specific inspection guidelines for check dams include the following.
- Inspect check dams and channels for damage after each runoff event (including runoff from snowmelt), and correct all damage immediately.
- Regular inspections should be made to ensure that the center of the dam is lower than the edges.
- Check the structural integrity of the check dams – shape, anchoring, and overall condition.
- Look for scour underneath the check dam and bypasses on the sides.
- Note the amount of sediment deposited upslope of the check dams.
- Observe erosion of ditch segments between check dams – downcutting and side scour.
MnDOT’s workmanship and rework schedule (2016; version under development at the time of manual update) identifies common deficiencies for various types of temporary sediment control BMPs – including ditch checks – and corrective actions for these deficiencies (see table below). Once complete, the full, final version of this table will replace Table 2573-1 in MnDOT Standard Specifications for Construction (2016 edition).
Temporary Sediment Control: Corrective Actions - check dams
Link to this table
| Item | Corrective Action Required if | Corrective Action |
|---|---|---|
| Ditch checks (see also sediment control logs) |
|
|
| Sediment control logs |
|
|
Maintenance
- Remove sediment adjacent to and accumulated behind check dams before it reaches halfway to the top of the dam.
- Restore dislodged or washed out check dams to their original configuration.
- Fill in or otherwise repair areas where check dam undercutting or bypasses have occurred.
- Add stones to dams as needed to maintain design height and cross section. Use larger stone, if necessary, to counter higher-than-expected flow velocities.
- Repair ditch/channel areas where excessive downcutting or side scour have occurred.
- Where fiber logs become dislodged by high ditch/channel velocities, use longer stakes and reduce the spacing between stakes.
- If the selected configuration is not preventing channel erosion, consider other materials or closer spacing in areas experiencing the most problems.
- If significant erosion occurs between dams, install a protective turf reinforcement mat or section of riprap liner in that portion of the channel.
- Rock weirs should be replaced when filtering capacity is reduced by one-half.
The following table provides an example summary of inspection and maintenance activities for check dams.
Summary of inspection and maintenance activities for check dams. Source: Prince George’s County Maryland
Link to this table
| BMP Element | Inspection | Maintenance |
|---|---|---|
| Entire facility | Trash/debris is present | Remove trash/debris |
| Sediments | Accumulation of sediment | Clean out the sediment |
| Inflow point | Erosion/undercutting | Provide erosion control devices such as reinforced turf matting or riprap |
| Erosion | Banks are severely eroded | Stabilize the banks. Replace the rocks or add rocks if needed |
| Vegetation | Overgrown vegetation | Mow or trim the vegetation |
| Ponding | Standing water | Drain the water and remove the clogged material between the rocks or logs |
| Sandbags | Sandbag fabric shows sign of deterioration | Remove and replace the sand bags |
Costs
The following table summarizes estimated BMP costs based on MnDOT data summarizing average bid prices for awarded projects in 2014.
Check dam related average Bid Prices
Link to this table
| Bid item | Item description | Units | Average price |
|---|---|---|---|
| 2573.602/00015 | Rock ditch check | EACH | $1,305.98 |
| 2573.533/00011 | Sediment control log type straw | LF | $2.90 |
| 2573.533/00012 | Sediment control log type wood fiber | LF | $4.29 |
| 2573.533/00013 | Sediment control log type coir | LF | $13.25 |
| 2573.533/00015 | Sediment control log type compost | LF | $2.58 |
| 2573.533/00016 | Sediment control log type rock | LF | $5.00 |
| 2573.533/00017 | Sediment control log type blanket system | LF | $2.52 |
LF = linear foot
Reference materials
Except where more stringent requirements are presented in this guidance, check dams (temporary dikes) shall comply with MnDOT and other state requirements. Primary design references include:
- MnDOT Erosion Control Handbook II
- Minnesota Urban Small Sites Best Management Practice Manual (Check Dams)
- Minnesota NPDES/SDS Construction Stormwater General Permit
- MnDOT Standard Specifications for Construction
- MnDOT Standard Drawings for use in Construction Plans
The following is a list of additional resources that are not specific to Minnesota:
- Clean Water Services Erosion Prevention and Sediment Control Manual (4.2.1 Check Dam, 4.3.7 Pre-Fabricated Barrier System, 4.3.14 Wattles)
- North Carolina Erosion and Sediment Control Planning and Design Manual (6.63 Rock Dam)
- Tennessee Department of Environment and Conservation (TDEC) Erosion and Sediment Control Handbook (7.20 Check dam, 7.25 Tubes and wattles)
- Virginia Erosion and Sediment Control Handbook (3.20 Rock Check Dams)
- Clark County Washington Stormwater Manual (BMP C207: Check Dams, BMP C208: Triangular Silt Dike)
- Best Management Practices (BMPs) for Controlling Erosion, Sediment, and Pollutant Runoff from Construction Sites. University of Kentucky, 2009.
- Delaware Erosion and Sediment Control Handbook. 2003.
Related pages
- Erosion prevention practices
- Erosion prevention practices - temporary seeding and stabilization
- Erosion prevention practices - natural and synthetic mulches
- Erosion prevention practices - tackifiers and soil stabilizers
- Erosion prevention practices - erosion control blankets and anchoring devices
- Erosion prevention practices - turf reinforcement mats
- Erosion prevention practices - Riprap
- Sediment control practices
- Sediment control practices - Vehicle tracking BMPs
- Sediment control practices - Perimeter controls for disturbed areas
- Sediment control practices - Check dams (ditch checks, ditch dikes)
- Sediment control practices - Diversion barrier controls (cofferdams/temporary dikes)
- Sediment control practices - Storm drain inlet protection
- Sediment control practices - Outlet energy dissipation
- Sediment control practices - Sediment traps and basins
- Sediment control practices - Stabilized earth/soil berm
- Construction stormwater treatment - dewatering, including chemical treatment and sediment filtration
- Construction stormwater best management practice – buffer zones
- Other practices
This page was last edited on 14 February 2023, at 14:27.

